Evaluation of Braze or Weld Joints
The switching properties of brazed and welded contact assemblies is strongly dependent on the quality of the joint between the contact and the carrier. The required high quality is evaluated through optical methods, continuous control of relevant process parameters and by sampling of finished products.
Contents
Brazed Joints
Despite optimized brazing parameters non-wetted defect areas in the braze joint cannot be avoided completely. These wetting defects can mostly be traced to voids caused by flux inclusions in the braze joint area. Depending on the shape and size of the joint areas, the portion of the fully wetted joint is between 65% and 90%. In its final use in switching devices a joint area of 80% is considered good or excellent if the individual void size does not exceed 5% of the joint area. Frequently wetted joint areas > 90% with voids < 3% can be obtained.
Evaluation of the quality of the joint can be performed either by destructive or non-destructive methods.
Destructive Testing
Destructive tests can be performed on a sampling basis in rather simple ways:
- De-brazing
The contact tip is being removed by slow heating and simultaneous application of force perpendicular to the contact surface area. Visual inspection of the separated components reveals the non-wetted defect areas as discoloration from either flux remnants or oxidation of the carrier material.
- Milling Sample
The contact tip is milled off in layers to a depth that makes the joint area visible for optical evaluation.
- Saw-Cutting
A crossing pattern is cut with a fine saw into the contact tip. Areas that are not bonded fall off in pieces.
- Metallographic Micro-section
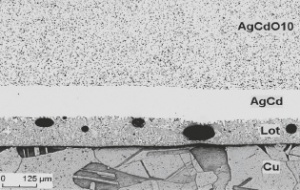
In a metallographic micro-section perpendicular to the contact surface wetting defects can also be made visible Figure 1 (Fig. 3.14) which however are only indicative of the brazing temperature and brazing time.
- Shear test
The contact tip is sheared off from the carrier with the required shear force being a measure for the bond quality. This method is especially suitable for hard and brittle contact tip materials such as for example tungsten.
Non-Destructive Test Methods
Typically the non-destructive testing of braze joints requires more elaborate test equipment. Besides this such test methods have limitations regarding the shape of the contact tips and/or carriers. The prevalent methods are ultrasound testing and X-ray analysis.
- Ultrasonic testing
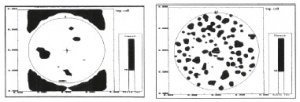
This method is based on the disruption of the propagation of sound waves in different media. High resolution modern test systems with graphic print-out capabilities and analytical software are capable to detect even small (<0.5 mm diameter) voids in the braze joint. The portion of the wetted areas is calculated as a percentage of the whole joint area. Figure 2 (Fig. 3.15) shows an example of different braze qualities for a Ag/SnO2 contact tip brazed to a copper carrier and illustrates the position and size of void areas as well as the final joint quality.
- X-Ray testing
X-ray testing is an additional method for evaluating brazed joints. Using finefocus X-ray beams it is possible to achieve a sufficient picture resolution. There are however limitations about the thickness of the contact tip compared to the size of the void area. This expensive test method is rarely used for contact assemblies.
Welded Joints
Since welded contact assemblies are usually produced in rather high quantities the quality of the weld joints is monitored closely. This is especially true because of the high mechanical and thermal stresses quite often exerted on the joint areas during switching operations. The quality of the joints is dependent on the process control during welding and on the materials used to manufacture the welded assemblies.
Despite the ability to closely monitor the relevant welding parameters such as weld current, voltage and energy, simultaneous testing during and after manufacturing are necessary.
A simple and easy to perform quality test is based on the shear force. Evaluations of welding assemblies in electrical performance tests have shown however that the shear force is only a valid measure if combined with the size of 2 the welded area. As rule of thumb the shear force should be > 100 N/mm with the welded area > 60% of the original wire or profile cross-sectional area. For critical applications in power engineering, for example for high currents and/or high switching frequency, a higher percentage of the joint area is necessary.
During series production every weld is usually probed in a testing station integrated in the manufacturing line with a defined shear force – mostly 20% of the maximum achievable force. In this way defective welds and missing contacts can be found and sorted out. The monitoring of the actual shear force and size is performed during production runs based on a sampling plan.
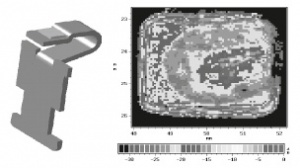
Besides destructive testing for shear force and weld area the non-destructive ultrasound testing of the joint quality is also utilized for welded contact assemblies Figure 3 (Fig. 3.16).
Selection of Attachment Methods
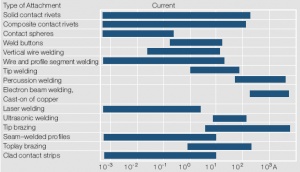
In the preceding sections a multitude of possibilities for the attachment of contact materials to their carriers was described. A correlation of these methods to the switching current of electromechanical devices is illustrated in Figure 4 (Tab. 3.2). It shows that for the same switching load multiple attachment methods can be applied. Which method to chose depends on a variety of parameters such as contact material, material combination of contact and carrier, shape of the contact, required number of switching operations and last but not least the required volume of parts to be manufactured.
Based on the end application the following can be stated as general rules: Electroplated contact surfaces are limited to switching without or under extremely low electrical loads. In the lower and medium load range contact rivets and welded contacts are used. For high switching loads brazing, especially resistance and induction methods, are utilized. For extremely high loads, for example in high voltage switchgear, percussion welding, electron beam welding, and copper cast-on processes are preferred.


