Manufacturing of Single Contact Parts
The group of single contacts includes contact rivets, contact tips, and formed parts such as weld buttons. Contact spheres (or balls) are today rarely used because of economical considerations.
Contents
Contact Rivets
Solid Contact Rivets
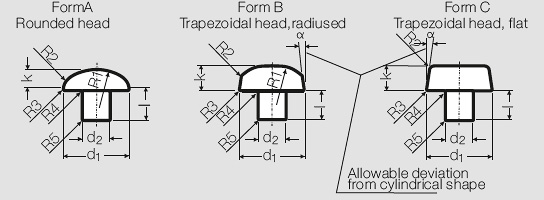
Solid contact rivets are the oldest utilized contact parts. Their manufacturing requires a ductile contact material and is done without scrap on fully automated special cold heading machines. A wire slug is cut off and the rivet head is formed by pressing and hammering. This way contact rivets with various head configurations such as flat, domed, spherical, or pointed can be manufactured depending on the final application and switch or relay design.
- Typical Contact Shapes of Solid Contact Rivets Figure 1
- Contact Materials
Au-, AgPd-, PdCu-Alloys, Ag, AgNi 0,15 (ARGODUR-Spezial), AgCu, AgCuNi (ARGODUR 27), Ag/Ni (SINIDUR), Ag/CdO (DODURIT CdO), Ag/SnO2 SISTADOX), Ag/ZnO (DODURIT ZnO),Ag/C 97/3*, Cu
* dimensionally very limited
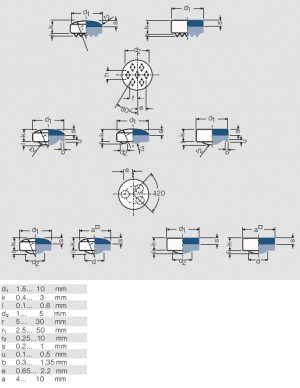
- Dimensional Ranges Figure 2
The respective parameters cannot be chosen independently of each other. They mainly depend on the ductility of the required contact material. Before a final decision on the dimensions we recommend to consult with the contact manufacturer.
- Qualitätsmerkmale und Toleranzen Figure 3
Characteristics | Form A Form B Form C Rounded headf Trapeziodal Trapeziodal head, radiused head,flat | Suggested test equipment |
|---|---|---|
a) Head diameter d1 [mm] | d1< 4 + 0,06 During optical measurement d1> 4 - 0,06 disregard corner radius R3 | Comparator, Measuring microscope |
b) Head thickness k [mm] | d1< 4 + 0,03 d1> 4 + 0,08 | Micrometer, Dial indicator |
c) Shank diameter d2 [mm] | d2< 2 - 0,06 d2> 2 - 0,08 | Micrometer |
d) Shank length [mm] | + 0,15 | Micrometer, Dial indicator, Comparator |
e) Radius at center of contact surface R1 [mm] | Form A und B: Within the head thickness tolerance Form C: Allowable deviation from flatness: convex: within head thickness tolerance concave: 0.005 d1 | Comparator, Comparator template, Radius gage |
f) Radius at edge of contact surface R2 [mm] | Form A: Smooth transition to R1 Form B: 1.5 R2 allowed Form C: <0,1d1 | Profile template, Comparator, Radius gage |
g) Radii R3 and R5 [mm] | Sligth rounding allowed | Comparator |
h) Transition radius head underside to shank R4 [mm] | d2 < 2 R4 < 0,08 if covered by DIN 46240 pg.1 d2 > 2 R4 < 0,1 d2 > 3 R4 < 0,2 | Comparator if in doubt: microsection |
i) Allowed deviation from cylindrical shape | max. 7° 30’: or d2 < l, l > 0,7 mm and k < 0,6 d1. max. 15°: for all other rivets | Comparator |
k) Concentricity between head and shank center line [mm] | d1 < 4 0,15 d1 > 4 0,2 in general: approx. 70% of allowable deviation per DIN 46240 | Comparator, Special turn fixture |
Composite Contact Rivets
Clad rivets for which only a part of the head (composite or bimetal rivets) or also the shank end (tri-metal rivets) are composed of contact material – with the balance of the body mostly being copper – have replaced for many applications solid rivet versions because of economical considerations. The cost savings depend on the contact material and its required volume for a specific application. These composite rivets are also produced scrap-less from wire material on special machinery with two process variations utilized.
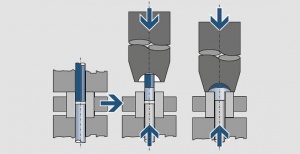
During cold bonding and heading the bond between the contact material and the copper is achieved without external heat energy by high plastic deformation at the face surfaces of the two wire segments Figure 4.
The bonding pressure must be high enough to move the lattice components of the two metals within a few atom radii so that the adhesion forces between atoms become effective.
Therefore the head to shank diameter ratio of 2:1 must be closely met for a strong bond between the two metals.
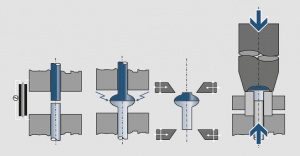
During hot bonding the required heat energy is applied by a short term electrical current pulse Figure 5 .
In the case of Ag and Cu a molten eutectic alloy of silver and copper is formed in the constriction area between the two wire ends. When using metal oxide containing contact materials the non-soluble oxide particles tend to coagulate and the bonding strength between the component materials is greatly reduced. Therefore the cold bonding technology is preferred for these contact materials. The during cold bonding required high surface deformation ratio can be reduced for the hot bonding process which allows the head to shank diameter ratio to be reduced below 2:1.
For composite rivets with AgPd alloys as well as alloys on the basis of Au, Pd, and Pt the above methods cannot be used because of the very different work hardening of these materials compared to the base material copper. The starting material for such composite rivets is clad strip material from which the contact rivets are formed in multiple steps of press-forming and stamping. Similar processes are used for larger contact rivets with head diameters > 8 mm and Ag-based contact materials.
- Typical contact shapes for composite rivets Figure 6
- Contact materials
Ag, AgNi 0,15 (ARGODUR), AgCu, AgCuNi (ARGODUR 27), Ag/Ni (SINIDUR), Ag/CdO (DODURIT CDO), Ag/SnO2 (SISTADOX), Ag/ZnO (DODURIT ZNO)
- Base materials
Cu
- Dimensional ranges Figure 7
These parameters cannot be chosen independently of each other. They depend mainly on the mechanical properties of the contact material. Before specifying the final dimensions we recommend to consult with the contact manufacturer.
- Quality criteria and tolerances Figure 8
Criteria | Form B Form C Trapezoidal head, Trapezoidal head radiused flat | Suggested test equipment |
|---|---|---|
a) Head diameter d1 [mm] | During optical measurement disregard corner radius R3 + 0.1 | Comparator, measu- ring microscpope |
b) Head thickness k [mm] | + 0.1 | Micrometer, Dial indicator |
c) Shank diameter d2 [mm] | Deviation from roundness and conical shape of shank only within allowed diameter tolerance d2 < 1.5 - 0.08 d2 > 1.5 - 0.1 | Micrometer |
d) Shank length l [mm] | + 0.15 | Micrometer, Dial indicator, Comparator |
e) Radius at center of contact surface R1 [mm] | Form B: + 10%, but not below + 0.5 mm Form C: Allowable deviation from flatness: convex: within head thickness tolerance concave: 0.005 d1 | Comparator, Comparator template, Radius gage, Profile template |
f) Radius at edge of contact surface R2 [mm] | per DIN 46240: Form B and C max. 0.5 without DIN:max. 1 | Profile template, Comparator, Radius gage |
g) Radii R3 and R5 [mm] | Sligth rounding allowed | Comparator |
h) Transition radius head underside to shank R4 [mm] | d2 < 2 R4 < 0.08 d2 > 2 R4 < 0.1 d2 > 3 R4 < 0.2 | Comparator, if in doubt: micro-section |
i) Allowed deviation from cylindrical shape | d1 < 4 up to 7°30’ + 2°30’ d1 > 4 up to 10° + 5° | Comparator, Measu- ring microscope, if in doubt: microsection |
k) Concentricity bet- ween head and shank center line [mm] | 5% of d1 | Comparator, Measuring microscope, Special turn fixture |
l) Contact layer thickness [mm] | In center area of 0.5 d1 s> nominal thickness Remaining head area must be covered | Measuring micros- cope, Microsection |
- Typical contact shapes of tri-metal rivets Figure 9
- Contact materials
Ag, AgNi 0,15 (ARGODUR), AgCu, AgCuNi (ARGODUR 27), Ag/Ni (SINIDUR), Ag/CdO (DODURIT CDO), Ag/SnO (SISTADOX), Ag/ZnO (DODURIT ZNO)
- Base materials
Cu
- Dimensional ranges Figure 10
- Standard values for rivet dimension
| d1 | k | 1 | d2 | α | r1 | s1 | s2 |
|---|---|---|---|---|---|---|---|
3.0 | 0.8 | 2.0 | 1.5 | 7.5° | 4.0 | 0.4 | 1.0 |
4.0 | 1.0 | 2.5 | 2.0 | 7.5° | 8.0 | 0.5 | 1.2 |
5.0 | 1.2 | 3.0 | 2.5 | 10° | 12.0 | 0.6 | 1.4 |
Braze Alloy Clad Contact Rivets
For special cases, especially high surrounding temperatures with high thermal and mechanical stresses during switching operations, a full metallurgical bond between the contact rivet and the contact carrier may be required to prevent a loosening of the connection and early failures of the device. To accomplish this superior bond a thin layer of brazing alloy is added to the underside of the head and the rivet shank. During assembly a thermal treatment is added after the mechanical staking.
Contact Rivets with Brazed Contact Material Layers
For certain applications contact rivets with non-ductile or brittle materials such as tungsten, silver–tungsten, or silver–graphite are required. Rivets with these contact materials can only be fabricated by brazing. Small round tips are brazed to pre-fabricated copper or steel bases using special brazing alloys in a reducing atmosphere.
Contact Tips
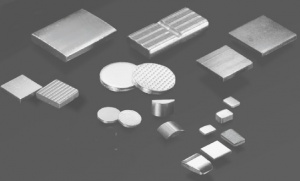
Flat or formed contact tips, welded or brazed to contact carriers, are frequently used in switching devices for higher power technology. Depending on the contact material and specified shapes these tips are produced by various manufacturing processes. The most frequently used ones are:
- Stamping from strips and profiles
- Cutting from extruded rods
- Pressing, Sintering, and Infiltrating
- Pressing, Sintering, and Re-Pressing
- Pressing and Sintering
For stamping sufficiently ductile semi-finished materials are needed. These are mainly silver, silver–alloys, silver–nickel, silver–metal oxide, and silver–graphite (with graphite particle orientation parallel to the switching surface). Silver–metal oxides and silver–graphite need an additional well brazable or weldable silver layer on the underside which can be bonded to the bulk of the contact material by various processes. To further facilitate the final attachment process strips and profiles are often coated on the brazing underside with an additional thin layer of brazing alloy such as L-Ag 15P (CP 102 or BCuP-5). For Ag/C with the graphite orientation perpendicular to the switching surface the brazable underside is produced by cutting tips from extruded rods and burning out graphite in a defined thickness.
The press-sinter-infiltrate process (PSI) is used mainly for Ag/W and Cu/W material tips with tungsten contents of > 50 wt%. A silver or copper surplus on the underside of the tip later facilitates the brazing or welding during final assembly.
The press–sinter–re-press method (PSR) allows the economic manufacturing of shaped contact parts with silver or copper contents > 70 wt%. This process also alloys parts pressed in two layers, with the upper being the contact material and the bottom side consisting of pure Ag or Cu to support easy attachment.
Press–sinter processes are limited to smaller Ag/W contact tips with a Ag content of approximately 65 wt%.
- Contact materials
Ag, AgNi 0,15 (ARGODUR Spezial), AgCu, AgCuNi (ARGODUR 27), Ag/Ni (SINIDUR), Ag/CdO (DODURIT CdO), Ag/SnO2 (SISTADOX), Ag/ZnO (DODURIT ZnO), Ag/C (GRAPHOR), Ag/W (SIWODUR), Ag/WC (SIWODUR C), Ag/WC/C (SIWODUR C/C), Ag/Mo (SILMODUR), Cu/W (CUWODUR)
- Typical contact shapes of tips and formed contact parts (Figure 11)
- Dimensional ranges
Attachment Method: Welding
Bonding Area: approx. 5 – 25 mm2
Attachment Method: Brazing
Bonding Area: > 25 mm2
Because of the wide variety of shapes of contact tips and formed contact parts the user and manufacturer usually develop special parts specific agreements on quality and tolerances.
Weld Buttons
For contacts used at higher temperatures, such as for example in controls for stove tops, the use of contact rivets or the direct welding of silver based contact materials on steel or thermo-bimetal carriers is usually not feasible. For such applications weld buttons are suitable contact components.
Weld buttons are round or rectangular tips manufactured from clad contact bimetal or in some cases tri-metal semi-finished materials. The surface layer is produced from the specified contact material, the bottom weldable layer from a material with higher electrical resistivity such as steel, nickel, or for example a copper-nickel alloy. For precious metal savings a third high conductive layer of copper may be inserted between the contact material and weld backing. To improve the welding process the underside often has an embossed pattern with one or more weld projections.
The manufacturing of weld buttons from bi– or tri–metal strip requires a ductile contact material. Weld buttons with tungsten contact layers are therefore produced by brazing of tungsten discs to a weldable pre-formed base.
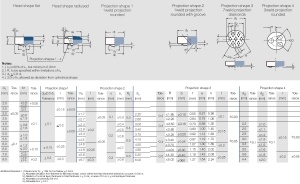
- Typical contact forms of weld buttons (Figure 12)
- Contact materials
Ag, AgNi 0,15 (ARGODUR-Spezial), AgCu, AgCuNi (ARGODUR 27), Ag/Ni (SINIDUR), Ag/CdO (DODURIT CdO), Ag/SnO2 (SISTADOX), Ag/ZnO (DODURIT ZnO)
- Carrier materials
Ni, Fe, CuNi, CuNiZn et.al.
- Dimensional Ranges (Figure 13)
- Quality criteria of standard weld buttons (Figure 14)


